以 Clock 应用为例追踪 TWIN 的运作流程
这是我的硕士论文笔记系列第六篇同时也是完结篇,原文写于2016年7月。
Flowchart
APP 創建過程
- 在
main()函式中執行twin_clock_start()即完成創建過程,下面會介紹該函數的內部運作原理1
twin_clock_start (tf->screen, "Clock", 0, 0, 240, 320);
- 在
twin_clock_start()函式代碼:1
2
3
4
5
6
7
8
9void twin_clock_start (twin_screen_t *screen, const char *name, int x, int y, int w, int h)
{
twin_toplevel_t *toplevel = twin_toplevel_create (screen, TWIN_ARGB32,
TwinWindowApplication,
x, y, w, h, name);
twin_clock_t *clock = twin_clock_create (&toplevel->box);
(void) clock;
twin_toplevel_show (toplevel);
} - 這裏的
twin_toplevel_t結構體中只包含了一個名爲box的結構體,其定義如下:1
2
3
4
5
6
7
8
9
10
11
12
13
14
15
16
17
18
19
20
21
22
23
24
25
26
27struct _twin_box {
twin_widget_t widget;
twin_box_dir_t dir;
twin_widget_t *children;
twin_widget_t *button_down;
twin_widget_t *focus;
};
struct _twin_widget {
twin_window_t *window;
twin_widget_t *next;
twin_box_t *parent;
twin_dispatch_proc_t dispatch;
twin_rect_t extents; /* current geometry */
twin_widget_t *copy_geom;
twin_bool_t paint;
twin_bool_t layout;
twin_bool_t want_focus;
twin_argb32_t background;
twin_widget_layout_t preferred;
twin_shape_t shape;
twin_fixed_t radius;
};
typedef enum _twin_box_dir {
TwinBoxHorz, TwinBoxVert
} twin_box_dir_t;- 創建toplevel後呼叫
twin_clock_create()函式創建toplevel->box的內容; - 最後呼叫
twin_toplevel_show()函式,後面會分析。
- 創建toplevel後呼叫
創建 Toplevel
- 呼叫
twin_window_create()創建一個window結構如下:1
2
3
4
5
6
7
8
9
10
11
12
13
14
15
16
17
18
19
20
21
22
23
24
25
26
27
28
29
30
31
32
33
34
35
36
37
38
39
40
41
42
43
44
45
46
47
48
49
50
51
52
53
54
55
56
57
58
59
60
61
62
63
64
65/*
* twin_window_t *window = twin_window_create (screen, format, style, x, y, width, height);
*/
struct _twin_window {
twin_screen_t *screen;
twin_pixmap_t *pixmap;
twin_window_style_t style;
twin_rect_t client;
twin_rect_t damage;
twin_bool_t client_grab;
twin_bool_t want_focus;
twin_bool_t draw_queued;
void *client_data;
char *name;
twin_draw_func_t draw;
twin_event_func_t event;
twin_destroy_func_t destroy;
};
/*
* A rectangular array of pixels
*/
typedef struct _twin_pixmap {
/*
¦* Screen showing these pixels
¦*/
struct _twin_screen *screen;
twin_count_t disable;
/*
¦* List of displayed pixmaps
¦*/
struct _twin_pixmap *down, *up;
/*
¦* Screen position
¦*/
twin_coord_t x, y;
/*
¦* Pixmap layout
¦*/
twin_format_t format;
twin_coord_t width; /* pixels */
twin_coord_t height; /* pixels */
twin_coord_t stride; /* bytes */
twin_matrix_t transform;
/*
¦* Clipping - a single rectangle in pixmap coordinates.
¦* Drawing is done clipped by this rectangle and relative
¦* to origin_x, origin_y
¦*/
twin_rect_t clip;
twin_coord_t origin_x;
twin_coord_t origin_y;
/*
¦* Pixels
¦*/
twin_pointer_t p;
/*
¦* When representing a window, this point
¦* refers to the window object
¦*/
twin_window_t *window;
} twin_pixmap_t;- 其中
client的上下左右算的都是相對位置。 pixmap則是呼叫twin_pixmap_create()函式創建,包含:- 幾何操作的矩陣初始化爲單位矩陣;
- clip region設爲時鐘整個大小;
- 呼叫
malloc()分配window對應大小的記憶體空間並初始化爲0;
- 創建完
pixmap後進行clip region的計算(使用client座標)、pixmap的重定位(以window的起始座位爲開始)等操作。
- 其中
- 創建了window,接着就是初始化toplevel。
1
2
3
4
5
6
7
8
9
10
11
12
13
14/* _twin_toplevel_init (toplevel, _twin_toplevel_dispatch, window, name); */
void
_twin_toplevel_init (twin_toplevel_t *toplevel,
twin_dispatch_proc_t dispatch,
twin_window_t *window,
const char *name)
{
twin_window_set_name (window, name);
window->draw = _twin_toplevel_draw;
window->destroy = _twin_toplevel_destroy;
window->event = _twin_toplevel_event;
window->client_data = toplevel;
_twin_box_init (&toplevel->box, 0, window, TwinBoxVert, dispatch);
} twin_window_set_name()函式除了設定名字外,還呼叫了一次twin_window_draw()函式將window的上方標題畫了出來(數據計算了出來)。- 接下來給
window指派對應的函式,分別是drawdestroyevent。 _twin_toplevel_draw()函式主要做了以下幾件事:- 禁止
screen更新; event種類設爲TwinEventPaint;- 呼叫
dispatch函式; - 打開
screen更新。
- 禁止
- 此時的
dispatch函式如下:1
2
3
4
5
6
7
8
9
10
11
12
13
14
15
16
17
18
19/*
(*toplevel->box.widget.dispatch) (&toplevel->box.widget, &event);
*/
twin_dispatch_result_t
_twin_clock_dispatch (twin_widget_t *widget, twin_event_t *event)
{
twin_clock_t *clock = (twin_clock_t *) widget;
if (_twin_widget_dispatch (widget, event) == TwinDispatchDone)
return TwinDispatchDone;
switch (event->kind) {
case TwinEventPaint:
_twin_clock_paint (clock);
break;
default:
break;
}
return TwinDispatchContinue;
} - 有兩個重點,分別是
_twin_widget_dispatch()和_twin_clock_paint()。後者無需多言,來看一下前者:- 如果是
TwinEventQueryGeometry,即目前event中還沒有幾何座標,則先不要佈局widget,檢查widget中是否存在備份的widget,若有則使用它進行派遣工作,然後直接返回派遣結束; - 如果是
TwinEventConfigure,則把widget的幾何座標設定爲event中的幾何座標然後返回派遣繼續值; - 如果是
TwinEventPaint,則呼叫_twin_widget_paint()(實際呼叫的是_twin_widget_paint_shape(),即畫出widget的形狀) 然後返回派遣繼續值。1
2
3
4
5
6
7
8
9
10
11
12
13
14
15
16
17
18
19
20
21
22
23
24
25
26
27twin_dispatch_result_t
_twin_widget_dispatch (twin_widget_t *widget, twin_event_t *event)
{
switch (event->kind) {
case TwinEventQueryGeometry:
widget->layout = TWIN_FALSE;
if (widget->copy_geom)
{
twin_widget_t *copy = widget->copy_geom;
if (copy->layout)
(*copy->dispatch) (copy, event);
widget->preferred = copy->preferred;
return TwinDispatchDone;
}
break;
case TwinEventConfigure:
widget->extents = event->u.configure.extents;
break;
case TwinEventPaint:
_twin_widget_paint (widget);
widget->paint = TWIN_FALSE;
break;
default:
break;
}
return TwinDispatchContinue;
}
- 如果是
_twin_toplevel_event()會呼叫一次派遣函式,並會判斷是否完成派遣工作,若完成則返回1。- 最後
_twin_box_init()中會呼叫_twin_widget_init()。
創建 Clock
- 實際呼叫的是
_twin_clock_init()函式:1
2
3
4
5
6
7
8
9
10
11
12
13
14
15
16
17
18
19void
_twin_clock_init (twin_clock_t *clock,
twin_box_t *parent,
twin_dispatch_proc_t dispatch)
{
static const twin_widget_layout_t preferred = { 0, 0, 1, 1 };
// preferred: width, height, stretch_width, stretch_height
_twin_widget_init (&clock->widget, parent, 0, preferred, dispatch);
clock->timeout = twin_set_timeout (_twin_clock_timeout,
_twin_clock_interval(),
clock);
}
typedef struct _twin_widget_layout {
twin_coord_t width;
twin_coord_t height;
twin_stretch_t stretch_width;
twin_stretch_t stretch_height;
} twin_widget_layout_t; - 參數中:
clock指針指向一塊twin_clock_dispatch大小的記憶體位置parent指針即&toplevel→boxdispatch即_twin_clock_dispatch,之前有介紹其功能
twin_clock_t結構體中有兩個成員widget和*timeout,前者呼叫_twin_widget_init()進行了初始化;而後者則是呼叫twin_set_timeout(),具體代碼如下:1
2
3
4
5
6
7
8
9
10
11
12
13
14
15
16
17
18twin_timeout_t *
twin_set_timeout (twin_timeout_proc_t timeout_proc,
twin_time_t delay,
void *closure)
{
twin_timeout_t *timeout = malloc (sizeof (twin_timeout_t));
if (!timeout)
return 0;
if (!start)
start = twin_now ();
timeout->delay = delay;
timeout->proc = timeout_proc;
timeout->closure = closure;
_twin_queue_timeout (timeout, twin_now() + delay);
return timeout;
}- 參數
timeout_proc爲:_twin_widget_queue_paint()函式會接着呼叫_twin_toplevel_queue_paint()→twin_set_work()→_twin_queue_work()→_twin_queue_insert(),即把widget畫好後把畫toplevel的任務按照優先權插入到工作隊列中;- 最後返回一個
twin_time_t(int32_t)的時間間隔,設定爲一秒(1000 ms),_twin_clock_interval()函式:- 原版實作是獲取Linux當前的微秒時間
tv_usec,用1000 - (tv_usec / 1000)做倒數; - 我們的版本使用STM32F429自帶的Systick計時器進行計時,每1ms發生一次中斷,設定變數
tv_msec加一,然後一樣的1000 - tv_msec;1
2
3
4static twin_time_t _twin_clock_timeout (twin_time_t maybe_unused now, void *closure) {
twin_clock_t *clock = closure;
_twin_widget_queue_paint (&clock->widget);
return _twin_clock_interval (); }
- 原版實作是獲取Linux當前的微秒時間
- 參數
delay即_twin_clock_interval()函式返回值; start爲全局變數,單位爲毫秒,只會在此函數中初始化,無用;_twin_queue_timeout()函式的功能是更新clock→timeout的時間,其中的head指針是一個全局變數,這裏會有序地插入到head指向的超時隊列中(相當於做了一個排序動作)。後面在dispatch時會呼叫_twin_run_timeout()函式來對超時隊列進行操作。- 插入是遍歷整個隊列,依次比較需要插入的超時成員與隊列中的超時成員的時間順序;
- 在遍歷的迴圈中,
proc指針指向的是_twin_timeout_order()函式,比較兩個任務的時間順序,返回TWIN_BEFORE(-1)、TWIN_AFTER(1)或TWIN_AT(0);1
2
3
4
5
6
7
8
9
10
11
12
13
14
15
16
17
18
19static void _twin_queue_timeout (twin_timeout_t *timeout, twin_time_t time)
{
timeout->time = time;
_twin_queue_remove (&head, &timeout->queue);
_twin_queue_insert (&head, _twin_timeout_order, &timeout->queue);
}
void _twin_queue_insert (twin_queue_t **head, twin_queue_proc_t proc, twin_queue_t *new)
{
twin_queue_t **prev, *q;
for (prev = head; (q = *prev); prev = &q->next)
if ((*proc) (new, q) == TWIN_AFTER)
break;
new->next = *prev;
new->order = 0;
new->walking = TWIN_FALSE;
new->deleted = TWIN_FALSE;
*prev = new;
}
- 參數
- 總結創建
clock做了以下工作:- 初始化
clock→widget; - 初始化
clock→timeout,並將其插入到超時隊列中。
- 初始化
畫出 Toplevel
- 首先呼叫了
_twin_toplevel_layout()函式,將event分別設置爲TwinEventQueryGeometry和TwinEventConfigure,然後呼叫*toplevel->box.widget.dispatch(此處爲之前有介紹的_twin_clock_dispatch函式)進行配置; - 接着執行
_twin_toplevel_paint()函式,實際就是將event設爲TwinEventPaint然後呼叫_twin_clock_paint()函式畫圖; - 最後執行
twin_window_show()函式,判斷此toplevel→box.widget.window是否已經顯示(在上則顯示在不則顯示),若沒有則呼叫twin_pixmap_show()函式進行重新設定。
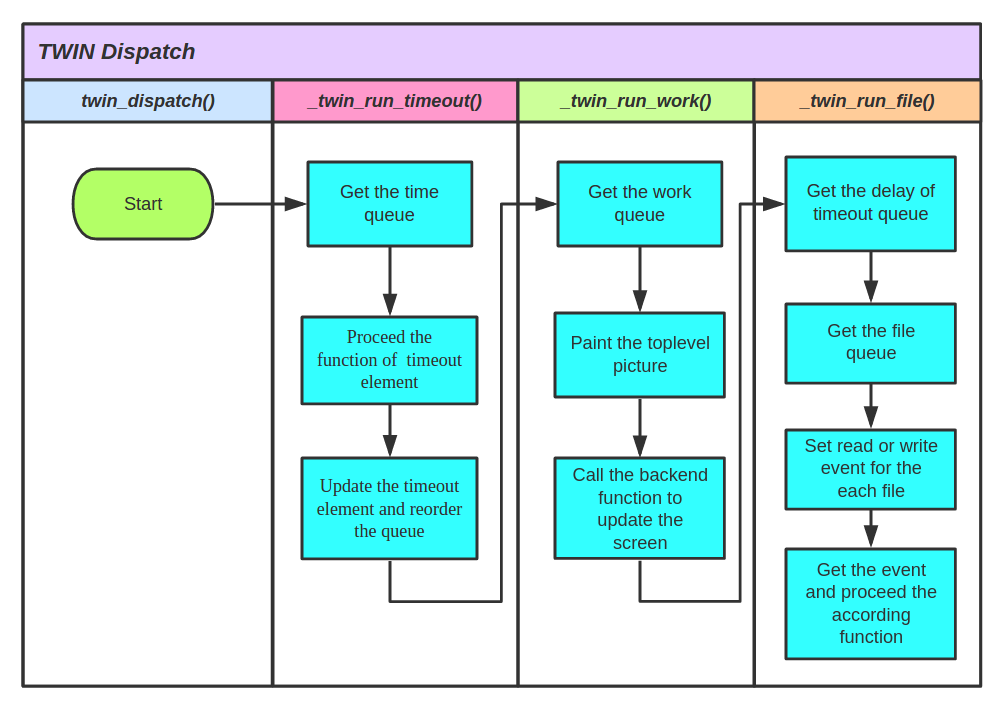
調度執行過程
twin_dispatch()函式中只有一個包含三個函式的迴圈:_twin_run_timeout()_time_run_work()_twin_run_file():用於監測外部滑鼠等活動,尚未實作;
_twin_run_timeout()
1 | void _twin_run_timeout (void) |
- 首先呼叫
_twin_queue_set_order()函式將整個隊列的walking狀態置爲TRUE。這裏有必要詳細介紹一下twin使用的鏈表結構:1
2
3
4
5
6
7
8
9
10
11
12
13
14
15
16
17
18
19
20
21typedef struct _twin_queue {
struct _twin_queue *next;
struct _twin_queue *order;
twin_bool_t walking;
twin_bool_t deleted;
} twin_queue_t;
struct _twin_timeout {
twin_queue_t queue;
twin_time_t time;
twin_time_t delay;
twin_timeout_proc_t proc;
void *closure;
};
struct _twin_work {
twin_queue_t queue;
int priority;
twin_work_proc_t proc;
void *closure;
};- 這裏隊列的實作和Linux kernel中雙循環鏈表的實作很類似。首先定義一個只包含前後指針的結構體
_twin_queue,然後內嵌到一個含有數據資源的結構體_twin_timeout中。這樣的將指針從具體的數據結構中提取出來的做法,構成了一種通用的雙向鏈表實現。其優點是未來只需要編寫通用鏈表函式,即可構造和操作不同對象的鏈表,而無需爲每類對象的每種列表編寫專用函式,實現了代碼的重用。 - 目前用到了兩個隊列(第三個
_twin_file暫時未使用),分別是_twin_timeout超時隊列和_twin_work工作隊列,均嵌套了_twin_queue結構。- 對隊列的各項操作,例如刪除、移除等均相同;
- 而像插入、重新排序因爲隊列的性質不同,排序的標準也不同(超時隊列會使用時間排序,而工作隊列會使用優先級),這樣就引入一個額外的參數——隊列的程式指針(
_twin_timeout_order和_twin_work_order)。
- 相比Linux kernel中爲了訪問到宿主結構體的巨集定義
offsettypeofcontainerof,這裏要簡單很多。在宿主結構體_twin_timeout的第一項成員即包含節點指針的twin_queue_t結構體,queue的起始地址即timeout的起始地址。因此在_twin_queue_set_order()函式返回head這個queue的結構體地址後,強行轉換爲twin_timeout_t類型就可以得到head的宿主結構體了。 - 這裏也就是
clock的timeout指向head,因此first得到了clock的timeout結構體地址。
- 這裏隊列的實作和Linux kernel中雙循環鏈表的實作很類似。首先定義一個只包含前後指針的結構體
- 後面這個迴圈的執行流程爲判斷超時隊列中成員的時間標籤,如果已經是過去式,則重新執行成員自帶的程式(這裏是呼叫
_twin_clock_timeout,會重畫clock的toplevel並加入到超時隊列中)。執行完畢後檢查是否還未到執行時間,若是則更新該成員的時間並重新對隊列進行排序,否則從隊列中刪除該成員。這樣做的目的就是不斷找出時間戳爲過去的成員,執行他們的任務並更新他們的時間。
_twin_run_work()
- 介紹過了超時隊列,工作隊列的機制也是類似的。
1
2
3
4
5
6
7
8
9
10
11void _twin_run_work (void)
{
twin_work_t *work;
twin_work_t *first;
first = (twin_work_t *) _twin_queue_set_order (&head);
for (work = first; work; work = (twin_work_t *) work->queue.order)
if (!(*work->proc) (work->closure))
_twin_queue_delete (&head, &work->queue);
_twin_queue_review_order (&first->queue);
} - 拿到工作隊列的第一個宿主成員後,開始遍歷整個列表,依工作優先級次執行他們的任務。
- 工作列表中實際上就兩個工作:
- 第一個是
_twin_toplevel_paint,用來計算出新的toplevel圖像 - 第二個是
_twin_fbdev_work,如果用的X Window則是_twin_x11_work,用來呼叫底層接口來實際更新熒幕畫面
- 第一個是