上手一个具体而微的ARM操作系统
这是我的嵌入式笔记第四篇,原文写于2015年。
印象中国内的嵌入式开发还是(可能是盗版的)IDE加载项目工程后一键编译/烧录的模式,开发人员对底层吃的不够透,离开IDE或者换个开发环境犹如深度近视患者离开了眼镜——寸步难行。再说远一点,似乎不少人的学习路径都是通过看中文教材和一些培训班视频(我当年也看过郭天祥和韦东山的视频😂),缺乏“一手”知识的摄取和体系化的训练。
这个实验除了可以深入了解操作系统的底层行为如上下文切换外,还有一个难点就是要在Linux环境下使用GNU Toolchain编译链接系统,最终烧录到ARM硬件上,非常非常的“硬核”。
准备工作
我们使用的硬件是意法半导体出的STM32F4 Discovery开发板,在开始实验之前,了解MCU、电路布局以及如何在STM32 MCU上开发都是必不可缺的步骤,主要就是阅读大量资料。
- STM32 程式開發:以 GNU Toolchain 為例
- ld: Using ld, The GNU linker, GNU LD 手冊略讀 (3): Chapter 3.7 ~ Chapter 3.11
- STM32: Reference Manual, Datasheet, Schematics(自行查阅官网最新版本)
- Course: Lab42: Mini ARM OS
Mini ARM OS
GitHub仓库点击标题即可访问,没想到已经有530颗星星了(12/29/2019)!以下笔记对应四年前的版本,少了第7和第8课,代码可能也有所改动,勿怪。
00-HelloWorld
- 先
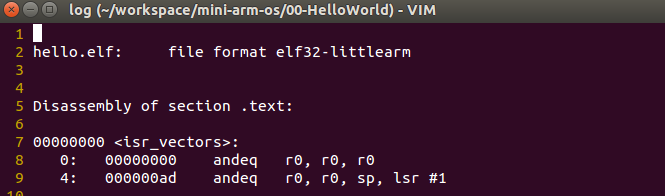
make然後make qemu後出現hello world,然後輸入arm-none-eabi-objdump -D hello.elf查看ELF文件(Executable and Linkable File)![]()
![]()
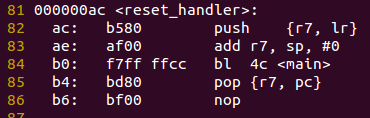
- 這裏值得注意的是,在M3上電取出MSP後,會取出PC的值,圖中可見是0x000000ad。但實際上reset_handler地址是從000000ac開始的。這是因爲:
當一個例外處理程式(exception handler)的位址在LSB設定為1,代表該例外處理程式運作於Thumb模式(Thumb mode),對ARM Cortex-M3來說,這是必要的,因為該處理器核心只支援Thumb-2指令集,而不支援ARM模式(也稱ARM code或ARM state)。
所以http://wiki.csie.ncku.edu.tw/embedded/Lab42 的截圖裏,reset_handler是從0x000000ad是實際編譯器在不同機器下編譯出來的不同? - 搭配hello.ld和startup.c一起看終於有種恍然大悟的感覺。.text section最前面的位置就是isr_vector,然後再是其他.text文件。當m3從Flash開始讀入數據時,首先就是isr_vector的內容,而isr_vector中首先給MSP地址賦0,然後是reset_handler,而reset_handler指向Main函數,這樣就導入我們寫的主函數了
01-HelloWorld
- 此實驗和00相比在ld上作了更多文章。00-HelloWorld的ld文件僅配置了Flash和.text section,而01中則多配置了RAM,將運行時不會更改的.text、.rodata、放入.text section中,.data放入.data section中
- AT的_sidata表示了.data載入RAM後的LMA。因爲data section會從flash搬移到SRAM中,因此它的LMA和VMA會不同。連結器腳本的一個重要作用,就是管理個別section的LMA和VMA,並在必要的情況下,把有關資訊提供給程式程式碼使用。
1 | /* Copy the data segment initializers from flash to SRAM */ |
02-ContextSwitch-1
- 在startup.c中定義了nmi_handler和hardfault_handler,地址在reset_handler之後,什麼時候會觸發他們呢?
- msp的值爲_estack=RAM的初始位置加上RAM的寬度,即0x20000000+40k,這樣意味這stack的爲40K大小,這個大小的stack感覺足夠寬裕!
- 接着看os.c裏的main函數
- cortex-m系列處理器core registers
- 首先定義額usertask的堆棧大小256*4byte=1k,然後定義一個指針*usertask_stack_start指向usertask堆棧加256-16的距離,而usertask的地址從usertask_stack_start棧底-8才開始,這中間多出了24byte。我想這應該是call stack的概念,爲了後門調用usertask函數的argument、return address、saved ebp%等留下空間(24byte應該是6個空格)
1
2
3
4
5
6
7
8
9
10
11
12
13
14
15
16
17
18int main(void)
{
/* Initialization of process stack.
* r4, r5, r6, r7, r8, r9, r10, r11, lr
*/
unsigned int usertask_stack[256];
unsigned int *usertask_stack_start = usertask_stack + 256 - 16;
usertask_stack_start[8] = (unsigned int) &usertask;
usart_init();
print_str("OS Starting...\n");
activate(usertask_stack_start);
// while (1); /* We can't exit, there is nowhere to go */
return 0;
}
- contex_swtich.s中.syntax unified:Cortex-m3爲了兼容thumb指令和thumb2指令,使這兩種指令可以使用統一的格式,引入了一種叫做“UAL”的語法機制。簡單說來就是程序員不用關心自己使用的是thumb還是thumb2指令,而是統一使用32位thumb2指令的語法格式書寫。具體的機器指令是16位還是32位由編譯器來決定。.syntax unified的作用就是制定使用這一功能,具體可以參考《cortex-m3權威指南》。
1
2
3
4
5
6
7
8
9
10
11
/* save kernel state */
mrs ip, psr
push {r4, r5, r6, r7, r8, r9, r10, r11, ip, lr}
/* switch to process stack */
msr psp, r0
mov r0, #3
msr control, r0
/* load user state */
pop {r4, r5, r6, r7, r8, r9, r10, r11, lr}
/* jump to user task */
bx lr - 接着這段代碼:
- MRS:Move to ARM register from system coprocessor register. MRS Rn, coproc_register中Rn is the ARM destination register, and Rn must not be PC. System coprocessor register應該是那些special registers,其中包含psr(Program status register)。MSR反之。
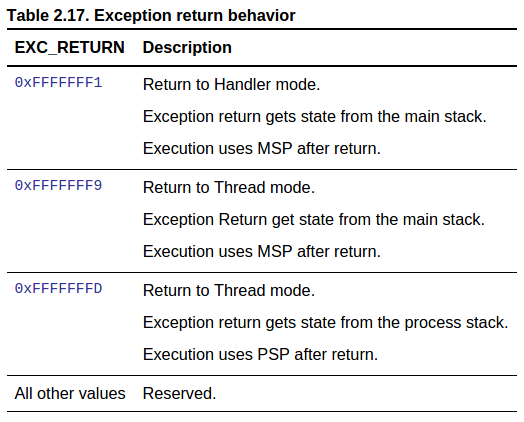
- 將main函數(kernel)的狀態存入堆棧後,將r0數據存入程序狀態寄存器(此時r0應該存放了usertask_stack_start地址),然後設定control寄存器爲0b11。所以現在stack pointer是PSP,而PSP中存放的是usertask_stack_start地址,至於Thread mode是Unprivileged。
![]()
- 最後把usertask_stack中的寄存器值拿出來,就可以跳轉到user state了
- 此处补充两篇 ARM 官方文档:2.6. Execution Modes, 2.1.1. Processor mode and privilege levels for software execution

03-ContextSwitch-2
- startup.c中多了一些聲明:
1
2
3
4
5
6
void nmi_handler(void) __attribute((weak, alias("default_handler")));
void hardfault_handler(void) __attribute((weak, alias("default_handler")));
void memmanage_handler(void) __attribute((weak, alias("default_handler")));
void busfault_handler(void) __attribute((weak, alias("default_handler")));
void usagefault_handler(void) __attribute((weak, alias("default_handler")));
void svc_handler(void) __attribute((weak, alias("default_handler"))); - alias (“target”): The alias attribute causes the declaration to be emitted as an alias for another symbol, which must be specified.
- 所以
*_handler全部alias到了default_handler上,而default_handler目前爲一個死循環:1
2
3
4void default_handler(void)
{
while (1);
} - syscall的定義,關於
svc 0這個回答很好1
2
3
4syscall:
svc 0
nop
bx lr - 在context_switch.S中定義了svc_handler函數,聯想到startup.c中的weak alias,可以理解weak alias的意思就是編譯器假如在文件中找到了某個函數的定義就會編譯,假如沒有找到就會將其alias到指定的weak alias函數。
- 關於stmdb,stm代表存儲更多寄存器,db代表在獲取前將地址減小。所以就是r0地址會增加9*4bytes,然後將{}中的9個寄存器從左至右從最低位置開始存放
1
2
3
4
5
6
7
8
9
10svc_handler:
/* save user state */
mrs r0, psp
stmdb r0!, {r4, r5, r6, r7, r8, r9, r10, r11, lr}
/* load kernel state */
pop {r4, r5, r6, r7, r8, r9, r10, r11, ip, lr}
msr psr, ip
bx lr![]()
- 關於stmdb,stm代表存儲更多寄存器,db代表在獲取前將地址減小。所以就是r0地址會增加9*4bytes,然後將{}中的9個寄存器從左至右從最低位置開始存放
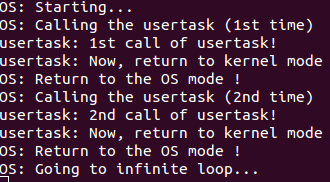
- 程序run可見當usertask觸發syscall後會保存其狀態,然後切回main函數輸出兩個print_str,然後回到usertask後會繼續接着上一次的執行到的地方繼續執行,再輸出兩句話,然後回到main函數,也是接着上次執行後的地方繼續執行。這驗證了之前代碼裏關於user state和kernel state的save和load動作。
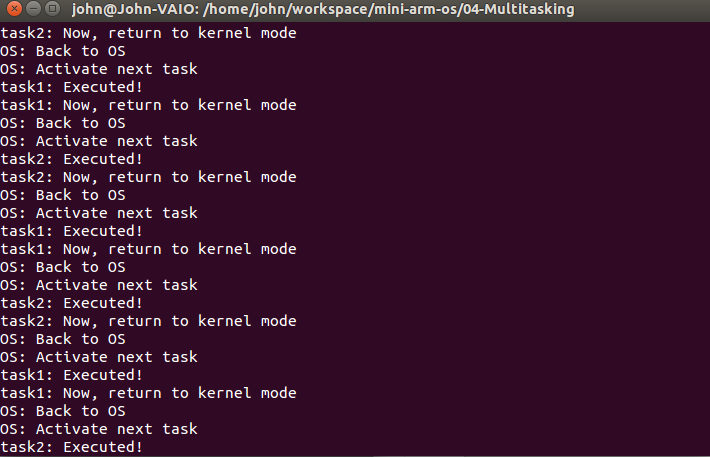
04-Multitasking
- diff context_switch.S ../03-ContextSwitch-2/context_switch.S ,發現:
- svc_handler中的msr psr, ip變成了msr psr_nzcvq, ip,nzcv爲psr的四個標誌位
- 另外在activate中,在切換到process stask後多一條isb指令:
Instruction Synchronization Barrier flushes the pipeline in the processor, so that all instructions following the ISB are fetched from cache or memory, after the instruction has been completed. It ensures that the effects of context altering operations, such as changing the ASID, or completed TLB maintenance operations, or branch predictor maintenance operations, as well as all changes to the CP15 registers, executed before the ISB instruction are visible to the instructions fetched after the ISB.
In addition, the ISB instruction ensures that any branches that appear in program order after it are always written into the branch prediction logic with the context that is visible after the ISB instruction. This is required to ensure correct execution of the instruction stream. - 重頭戲在os.c,首先宏定義了三個地址:
1
2
3![]()
- 接着新建一個task:而在main函數中,對應的調用是:
1
2
3
4
5
6
7
8
9
10
11
12
13
14
15unsigned int *create_task(unsigned int *stack, void (*start)(void))
{
static int first = 1;
stack += STACK_SIZE - 32; /* End of stack, minus what we are about to push */
if (first) {
stack[8] = (unsigned int) start;
first = 0;
} else {
stack[8] = (unsigned int) THREAD_PSP;
stack[15] = (unsigned int) start;
stack[16] = (unsigned int) 0x01000000; /* PSR Thumb bit */
}
stack = activate(stack);
return stack;
}1
2
3
4
5
6//定義了程式stack的數量(2個)和大小(256*4bytes)
unsigned int user_stacks[TASK_LIMIT][STACK_SIZE];
//定義了用戶程式的數量(2個)
unsigned int *usertasks[TASK_LIMIT];
//將之前定義的stack和function地址傳給create_task配置
usertasks[0]=create_task(user_stack[0],&task_func); - 當使用create_task函數第一次進行初始化時,在create_task中對task的stack進行了配置,並且因爲是第一次設定,將stack[8]存放了task_func的地址,然後進入到task_func中echo”task1 Created”&”return”後調用syscall回到了main函數。
- 當第二次呼叫create_task時,comment也有說明,因爲activate是從exception中返回,故將lr保存爲THREAD_PSP,而此時的func從stack[15]開始
- 爲何緊接着的stack[16]就要設epsr爲0x01000000?爲何processor可以認出這條指令是設置espr的?
The following can clear the T bit to 0: (1)instructionsBLX, BX and POP{PC} (2)restoration from the stacked xPSR value on an exception return (3)bit[0] of the vector value on an exception entry or reset. 所以需要再將epsr設爲thumb state。
05-TimerInterrupt
- 首先看啓動文件,多了pendsv和systick的定義,關於Cortex-M3設備的異常類型再複習一下
- void _attribute_((interrupt)) systick_handler(void)
The compiler generates function entry and exit sequences suitable for use in an interrupt handler when this attribute is present. With Epiphany targets it may also generate a special section with code to initialize the interrupt vector table.(https://gcc.gnu.org/onlinedocs/gcc/Function-Attributes.html)
06-Preemptive
- 在context_switch.s中對systick_handler定義了一樣的行爲,當systick exception觸發時,也會將進程切換到kernel mode。
- 一直沒找到delay()和systick有什麼直接聯繫,恍然大悟:當一個task在運行時,由於發生了systick exception,就會切換到kernel mode然後運行下一個task,這樣就如同preemptive。