GDB/CGDB入门与拆弹游戏
这是我的嵌入式笔记第七篇同时也是完结篇,原文写于2015年。本文除了介绍GDB/CGBD的基础使用方法以及嵌入式开发应用外,还会分享一个解密类经典游戏 Defusing a binary bomb with GDB ,非常有趣!
使用GDB
GDB
b [function name] *[address]:設置斷點d [breakpoint num]:刪除斷點c:繼續執行,到下一個斷點處(或運行結束)n:單步跟蹤程序,當遇到函數調用時,也不會進入函數內(針對src)s:單步調試,如果有函數調用,則進入函數(針對src)si:同s(針對asm)ni:同n(針對asm)p /x $r0:以16進制格式打印寄存器r0的值x/s [address]:以字串方式打印出地址所指向的內容layout asm/src:會顯示出當前正在執行的asm/src代碼段(這樣就不用看objdump -D啦)layout split:同時顯示當前執行的原始碼和組語layout regs:會以10進制和16進制方式顯示寄存器的值,包含r0-r12、sp、lr、pc、cpsr(這樣就可以不用p了)winheight name +/- count:調整 TUI 窗口大小,例如winheight src -5代表TUI窗口減少5行代碼info stack/variables/files/...- REF:
CGDB
- 安裝:
sudo apt-get install cgdb - 官方手冊:CGDB Manual 0.6.6(请查看手册最新版本:CGDB Manual 0.7.1)
- 相比GDB無需用layout調出TUI,CGDB會自動顯示出來,source window和GDB command window切換方式和VI相同,使用i和Esc。
- 新增及移除break point方法,直接在source window裏移動到想要新增/移除的位置,使用space鍵就可以了。
- 使用cross compiler方法:
cgdb -d arm-none-eabi-gdb -x "gdb.script" - Source window類似VI界面,常見的
:設定、/查詢等都可以使用,具體參考CGDB configuration commands - 使用
o可以選擇要顯示的檔案源碼,超潮der - 注意:
- 當前代碼行的行數會是粗體,不過不太明顯,用space敲敲看就知道在哪一行了
- 相比GDB,記得在CGDB裏不要敲
layout指令!會產生一堆亂碼死掉@@
可視化除錯工具
Using STM32 discovery kits with open source tools
- 原PDF链接已失效,原文请自行Google
- Written by STLINK development team
Installing GNU toolchain
- 请自行 Google
Installing STLINK
- Dependencies
libusb-1.0pkg-configautotools
- Install stlink
1
2
3
4
5
6
git clone https://github.com/texane/stlink stlink.git
cd stlink.git
./autogen.sh
./configure
make
make install
It includes:
- A communication library (stlink.git/libstlink.a).
- A GDB server (stlink.git/st-util).
- A flash manipulation tool (stlink.git/st-flash).
Using the GDB server
- A GDB server must be started to interact with the STM32. Depending on the discovery kit you are using, you must run one of the 2 commands:
st-util --stlinkv1: STM32VL discoverykit (onboard ST−link)st-util: STM32L or STM32F4 discoverykit (onboard ST−link /V2)
- Then, GDB can be used to interact with the kit:
arm-none-eabi-gdb XXX.elf
- From GDB, connect to the server using:
(gdb) target extended localhost: 4242(gdb) load(gdb) continue
Building and flashing a program
- If you want to simply flash binary files to arbitrary sections of memory, or read arbitary addresses of memory out to a binary file, use the st-flash tool, as shown below:
st-flash read v1 out.bin 0x8000000 4096: stlink-v1 command to read 4096 from flash into out.binst-flash read out.bin 0x8000000 4096: stlink-v2 commandst-flash write v1 in.bin 0x8000000: stlink-v1 command to write the file in.bin into flashst-flash write in.bin 0x8000000: stlink-v1 command
Notes
- Disassembling THUMB code in GDB
By default, the disassemble command in GDB operates in ARM mode. The programs running on CORTEX-M3 are compiled in THUMB mode. To correctly disassemble them under GDB, uses an odd address. For instance, if you want to disassemble the code at 0x20000000, use(gdb) disassemble 0x20000001 - 每次都輸入一堆必備的指令很麻煩,可以寫入一個
gdb.script檔案裏,例如:然後使用1
2
3target remote:4242
file stm32f429-example.elf
layout srcarm-none-eabi-gdb -x gdb.script進入後,單步執行即可。- 記得先打開
st-util; - 個人習慣把
arm-none-eabi-gdb -x gdb.script寫進Makefile裏。
- 記得先打開
Defusing a binary bomb
Lab43: Runtime Behavior
預期目標
- 複習ARM處理器和指令集,並深入stack和執行時期的行為
- 熟悉objdump、gdb等工具,並利用上述工具分析執行檔
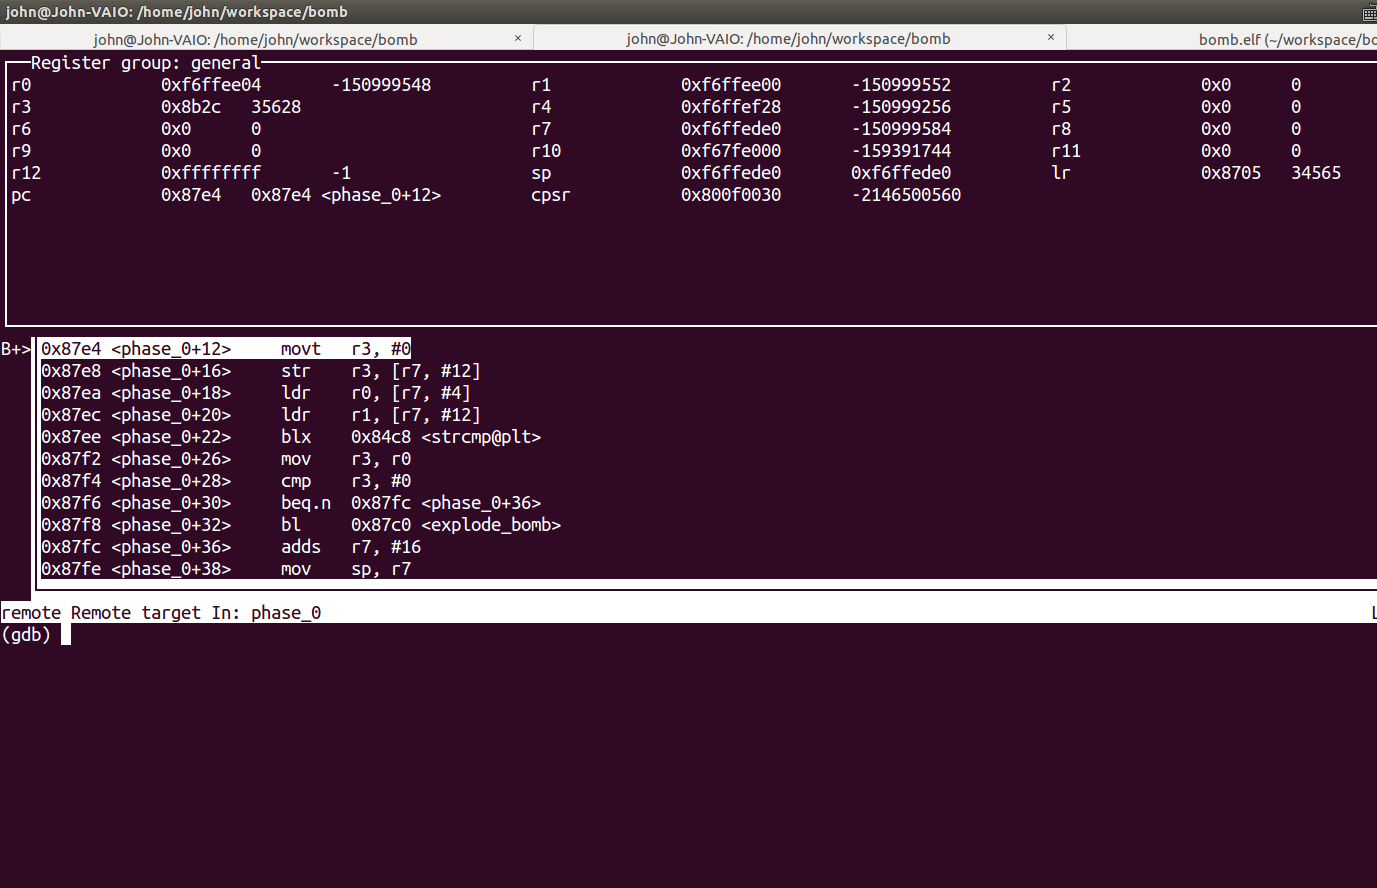
Phase 0, Phase 1: Comparison
- 使用
b phase_0設好斷點後,一個c來到phase_0函數,在源程式端輸入help,則可見:![]()
- 可以看到程式是用
r0和r1作比較,r0是我們輸入的值,r1则是我們要猜的值,這裏已經告訴我們是help了 - 用
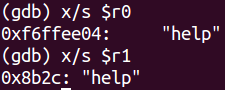
si執行到 0x87ee ,可以看到r0和r1的值:![]()
x/s $r0x/s $r1直接可以印出r0r1的地址和指向的值:![]()
- 同理,
continue到phase_1,印出r1![]()


Psalm 23:4
Yea, though I walk through the valley of the shadow of death, I will fear no evil; For You are with me; Your rod and Your staff, they comfort me.
Phase 2: For loop
- 先隨意輸入,看下寄存器
r1的值0x8bc8: "%d %d %d %d",看起來是要輸入4個整數,重頭再來一次 - 發現用
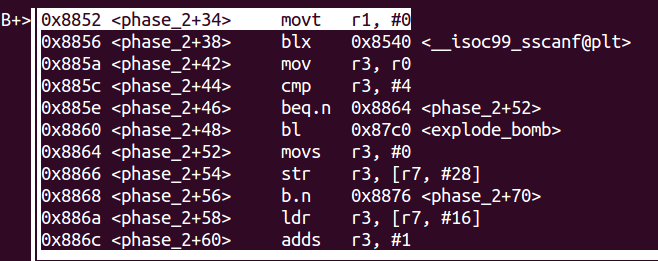
ni跳過function會讀不到指令,還是用si一步一步來吧![]()
- 走到0x885e,如果輸入的數的個數不是4個,就會explode bomb,若是則跳到0x8864
- 接下來的代碼中:
![]()
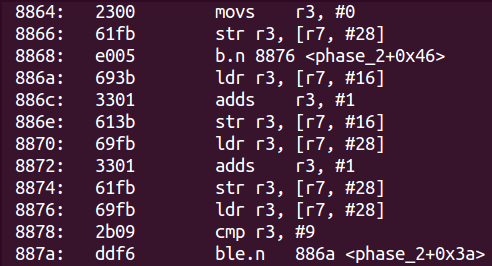
- 從0x886a到0x887a是一個迴圈,完整的
si走了一邊,只是運行完後不能讀到r2r3的值所指向的地址裏的值 - 類似的代碼爲:
1
2
3
4
5a=2;i=0;
do {
a+=1;
i++;
} while (i<=9); - 意外但肯定不是巧合地發現,之前輸入的四個數分別存在
r7+12r7+16r7+20r7+24裏(其實是用x/s $r7+n試出來的) - 所以輸入的第二個數(上述代碼中的
a)在迴圈後會增加10 - 而函數最後對比的是
r7+16和r7+20,需要他們相等,故輸入時第三個數減第二個數要等於10 - 測試果然過關~
![]()
- 從0x886a到0x887a是一個迴圈,完整的

Phase 3: If condition
- 第一步,設置斷點在
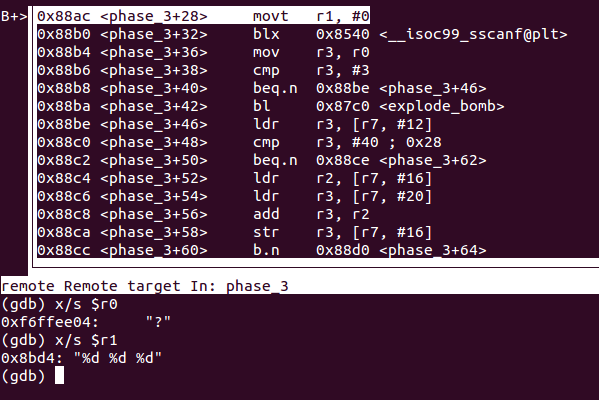
phase_3後隨意輸入進入斷點,印出r1的值,爲"%d %d %d",後面也有判斷輸入個數的代碼,和階段2同理:![]()
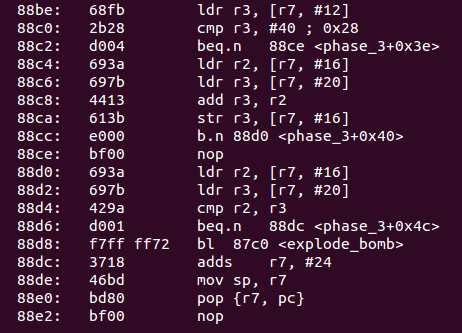
- 接着把斷點設在0x88be,代碼如下:
![]()
r3會先取出輸入的第一個數,和40做對比,這裏我輸入的1,因此會繼續往下走- 接着把給輸入的第二個數、第三個數的值賦給
r2r3,然後r3=r3+r2,再把r3的值存回[r7,#16] - 然後把
r2的值設爲[r7,#16],再把r3的值還原回初始的第三個數的值,對比他們相不相等- 即要使得
r3=r2+r3,所以在第一個數不爲40的情況下,第二個數和第三個數都只能是0 - 那如果第一個數等於40,則
r2r3相等即可
- 即要使得
- 試驗一下
- 當第一個數不爲40時,正確
![]()
- 當第一個數爲40時,正確
![]()
- 當第一個數不爲40時,正確


Phase 4: Iteration
- 與階段2、3同理,得知輸入爲一個整數
![]()
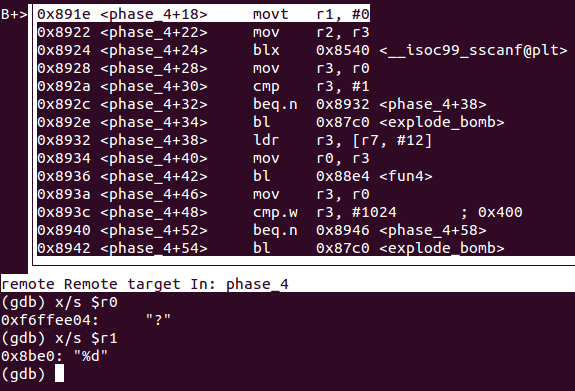
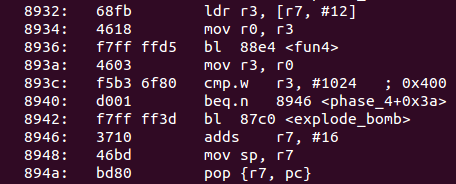
- 接下來
phase_4的函數很短,把輸入的數代入fun4後,return的值要等於1024![]()
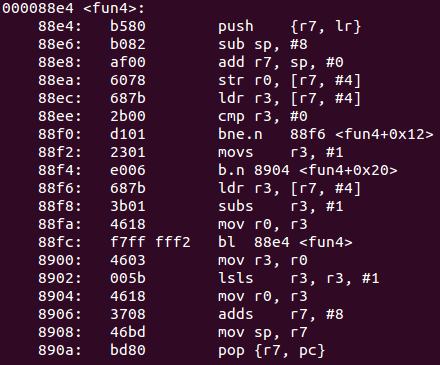
fun4的代碼如下:![]()
- 當
r3不爲0時,會一直減1然後調用自身函數;當r3終於減到0後,會在0x88f2賦值爲1,然後跳到8904,回傳上一層的fun函數。然後r3=r0=1,開始左移 - 所以相當於輸入的數字n,可以滿足2的n次方爲1024,即是正確答案,真相如下:
![]()